
The japanese panels represent a alternative to classic curtains. Inspired by the shōji, the classic sliding paper doors with wooden panels of Japanese homes are a practical and decorative solution that you can create yourself with a minimum of sewing knowledge. Do you want to know how to make Japanese panels for your windows?
With a linear and minimalist aesthetic, the panels are made up of multiple panels moving horizontally through rails, overlapping each other to provide privacy and / or prevent the passage of light. Especially suitable for large windows, you will find everything you need to make them at home in the market.
How to make Japanese panels step by step
The Japanese panels, as we have already mentioned, are inspired by the shōji, the typical doors of Japanese houses, usually made of paper with wooden panels. In order to emulate these, Japanese panels are usually made with rigid textiles and / or have weights in their lower area that keep the panels straight. The choice of fabric and weights will therefore be essential in the step by step, but there are other things to do before and after.
Take measurements
How to make Japanese panels for your windows? The first step in making your own Japanese panels will be take measurements of your windows. Start by measuring the width of the window, adding 15 inches on each side to calculate the length of the track. Next, measure the length from floor to ceiling if you want to place the rail on the ceiling, or from the floor to a specific wall height if you are installing a wall rail. You will have to subtract 5 centimeters from the measurement obtained in the first case and around 2,5 centimeters in the second.
Make decisions and buy materials
With the measures taken, the next step will be to make decisions. The most important and that will condition the rest will be choose the type of rail. Do you want the Japanese panels to have a central or side opening? With how many panels? Knowing it will allow you to calculate the number of meters of fabric to buy. But let's go step by step.
Rails and opening system
The manually operated panels, which we will focus on today, can feature two types of opening: central opening, in which the panels move from the center to both sides; and side opening, in which the panels can be moved to the right or left.
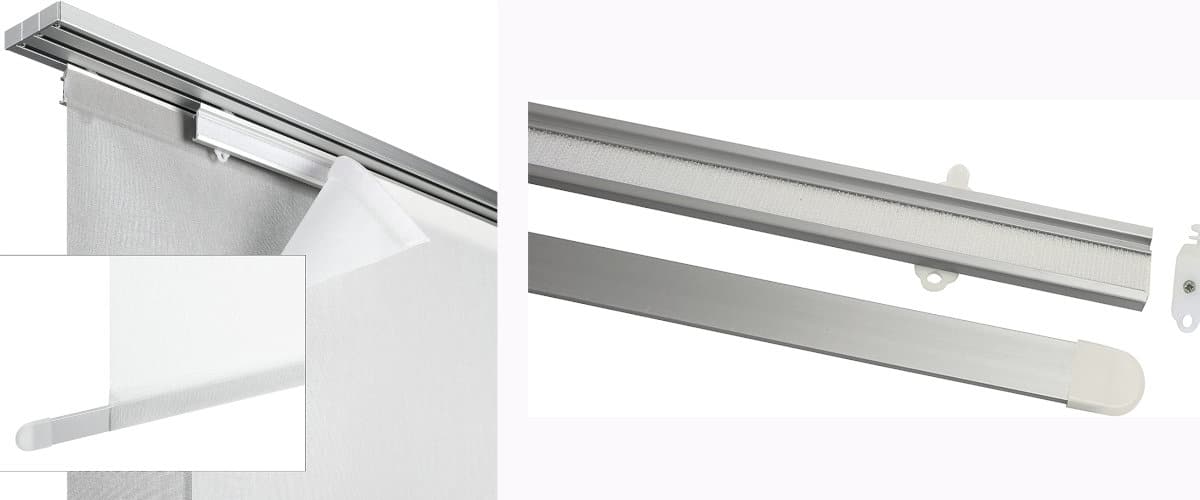
You will find in your frretería mechanisms with different number of tracks, up to 5 ways generally. For each of these, a door will move on which we will stick the panels that we will make for this purpose with Velcro. The normal thing is that in addition to the wall or ceiling support and the fabric holders, the packs include the plates or counterweights and the soft velcro that is sewn to the fabric. Make sure of it!
Knitwear
The panels can be made of technical fabrics such as screen or polyscreen and traditional fabrics such as canvas or sheer. The translucent fabrics offer intimacy, preventing them from seeing us from the outside and blurring the light. The «screen» fabrics, for their part, allow light to pass through but not heat. And opaque fabrics? They do not allow light or heat to enter so they are ideal in those rooms where we do not have blinds.

The usual and most comfortable way to work is to choose a sheer fabric in one or two tones, combining some lighter and others darker so that there is a contrast. However, this does not have to be your choice. Whatever this is, what you will always need to do is some calculations to determine the amount of fabric to buy.
What we will do is calculate the fabric needed to make each panel. Knowing the measurements of the gates, we will add to the width of this about 16-20 centimeters to make the side hems (8-10 on each side), and at the height of which we had already taken note, 12 centimeters to be able to finish the part panel top and bottom. Then we will only have to multiply the total measurement by the number of panels.
Weights
Don't your rails come with counterweights? If so, in order to keep the Japanese panels straight you will have to buy a rod or plate to be placed in the lower area of each panel. Others can also be placed in intermediate positions to distribute the weight evenly and emulate the quadrants of Japanese doors, but if you are going to create your own panels it will be much easier if you only place the one on the bottom.
Sew and assemble your Japanese panel
Cut the panels taking into account the measurements we already calculated, taking into account that to the width of each panel you must add 16-20 centimeters for the side hems and to the height 12 centimeters to finish the top and bottom. Once cut make double hems 5 cm on each side, ironing first and stitching later.
Once you have the sides finished, fold at the top 2 cm of sheer to attach a 2 cm wide velcro strip and pass a stitch above and below it. Then, sew the hem that will be double 5 centimeters and that you will have to leave a few centimeters open on the sides to be able to insert and remove the counterweight.
Lastly, attach the wall or ceiling mount, measuring well before to avoid making mistakes, mount the gates on the tracks and stick the panels on them with the velcro. Ready! Now you can enjoy the warmth and intimacy that the Japanese panels will give to the room.
Was this step by step on how to make Japanese panels helpful to you?